
This is the sixth article of the Getting started with Docker series. In this article, I want to discuss how docker volumes work and how to use them to separate an application from its data.
The upgrade problems
In the first article of this series, in the “Why Docker?” section we discussed why docker technology became so popular in recent years. Docker in modern application infrastructure allows us to easily manage the application lifecycle simplifying its deployment. One of the major pain in application deployment is the upgrade. With Docker, it is a simple container replacement.
However, in our PostgreSQL cluster, we have a problem. The data folder (/home/postgres/data) is inside the container so if we replace a container we lost the data directory and the configuration.
How we can solve this issue? Docker allows the separation between binaries, data, and configuration with the volumes. Basically, you can allocate space on the host system and share it with the container, when it is destroyed space still exists.
Docker storage types
Docker has three options for containers to store files in the host machine so that the files are persisted even after the container stops.
- volumes
- bind mounts
- tmpfs mount (only on Linux)
Volumes are stored in a part of the host filesystem which is managed by Docker (/var/lib/docker/volumes on Linux). Non-Docker processes should not modify this part of the filesystem. Volumes are the best way to persist data in Docker.
Bind mounts are the folder on the host system shared with the container. Non-Docker processes on the Docker host or a Docker container can modify them at any time.
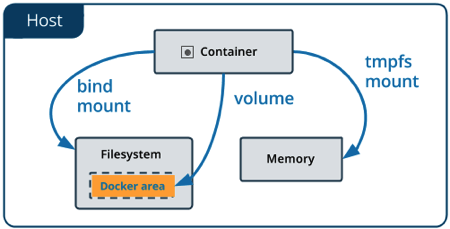
Photo from https://docs.docker.com
Tmpfs mount is a disk space in memory very useful when the container needs to quickly manipulate files. Imagine, for example, an application that receives zip files that must be expanded to do some activities. In this scenario, a temporary filesystem is perfect to improve performance.
Volumes vs Bind mounts
For our PostgreSQL cluster, both volumes and bind mounts are good solutions to persist data outside the container and separate them from the binaries. However, there are some benefits in using volumes over bind mounts. From the official documentation here a list of some of them:
- Volumes are easier to back up or migrate than bind mounts.
- You can manage volumes using Docker CLI commands or the Docker API.
- Volumes work on both Linux and Windows containers.
- Volumes can be more safely shared among multiple containers.
- Volume drivers let you store volumes on remote hosts or cloud providers, to encrypt the contents of volumes, or to add other functionality.
- New volumes can have their content pre-populated by a container.
However, if we need to have a storage space of a specific filesystem we cannot use volumes because their filesystem is the one present under the folder /var/lib/docker/volumes on the host system and we cannot change it. If the application needs a specific filesystem we need to allocate it on the host system and share it with the container via bind mounts.
Docker volumes cheat sheet
The docker commands that we need to learn to manage volumes are few. To create a Docker volume you can use the command:
docker volume create <volume name>
You can check the volume created with the command:
docker volume ls
Once created the volume and container lifecycles are unrelated. If the volume is not required any more you can remove it with the command:
docker volume rm <volume name>
If you want to bind mounts a host folder or a volume to a container use the following command:
docker run -it -v <host folder or volume name>:<container folder> <image name> /bin/bash
The same -v option can be used with the “docker create” command:
docker create -it -v <host folder or volume name>:<container folder> <image name> /bin/bash
How to change PostgreSQL cluster code
In the fifth article, we discussed how to create a PostgreSQL cluster with three containers. In order to have an upgradable cluster, we need to separate PostgreSQL binaries from data and logs.
Script for volumes managements
As a first step, we need the script build_volumes.sh to create the three volumes.
NODE1_VOLUME=volume1
NODE2_VOLUME=volume2
NODE3_VOLUME=volume3

docker volume create ${NODE1_VOLUME}
docker volume create ${NODE2_VOLUME}
docker volume create ${NODE3_VOLUME}
Here the code of the relative clean_volumes.sh script.
NODE1_VOLUME=volume1
NODE2_VOLUME=volume2
NODE3_VOLUME=volume3

docker volume rm ${NODE1_VOLUME}
docker volume rm ${NODE2_VOLUME}
docker volume rm ${NODE3_VOLUME}
Modify the start_containers.sh script
We need to modify the start_containers.sh to bind mount the volumes to the three containers.
...
NODE1_VOLUME=volume1
NODE2_VOLUME=volume2
NODE3_VOLUME=volume3
...
docker volume inspect ${NODE1_VOLUME} > /dev/null
if [ $? -ne 0 ]
then
    echo "ERROR: ${NODE1_VOLUME} doesn't exist. Run the script "./build_volumes" first."
    exit 1
fi

docker volume inspect ${NODE2_VOLUME} > /dev/null
if [ $? -ne 0 ]
then
    echo "ERROR: ${NODE2_VOLUME} doesn't exist. Run the script "./build_volumes" first."
    exit 1
fi

docker volume inspect ${NODE1_VOLUME} > /dev/null
if [ $? -ne 0 ]
then
    echo "ERROR: ${NODE1_VOLUME} doesn't exist. Run the script "./build_volumes" first."
    exit 1
fi
...
docker create -it --net ${PRIVATE_NETWORK_NAME} --ip ${NODE1_PRIVATE_IP} --hostname ${NODE1_NAME} --name ${NODE1_NAME} --env NODE_NAME=${NODE1_NAME} --env MASTER_NAME=${MASTER_NAME} -p ${NODE1_PORT}:5432 -v ${NODE1_VOLUME}:/home/postgres/data postgresql /bin/bash
docker create -it --net ${PRIVATE_NETWORK_NAME} --ip ${NODE2_PRIVATE_IP} --hostname ${NODE2_NAME} --name ${NODE2_NAME} --env NODE_NAME=${NODE2_NAME} --env MASTER_NAME=${MASTER_NAME} -p ${NODE2_PORT}:5432 -v ${NODE2_VOLUME}:/home/postgres/data postgresql /bin/bash
docker create -it --net ${PRIVATE_NETWORK_NAME} --ip ${NODE3_PRIVATE_IP} --hostname ${NODE3_NAME} --name ${NODE3_NAME} --env NODE_NAME=${NODE3_NAME} --env MASTER_NAME=${MASTER_NAME} -p ${NODE3_PORT}:5432 -v ${NODE3_VOLUME}:/home/postgres/data postgresql /bin/bash

...
The code first checks that volume exists and then binds mounts them to the containers.
How to verify if the cluster is working?
The process is exactly the same as the previous article. This time even if you stop a container, no data loss occurs. The separation of data from binary allows you to run two new scenarios: upgrade and failover. You can find how to implement these scenarios here.
What’s next?
In this article, we discussed how to use volumes or bind mounts to separate binaries from data e logs of an application. You can download the source code here in the postgresql-cluster-volume folder. In the next article, we will see how to manage the Docker build and runtime configuration with Docker Compose instead of helper scripts (i.e. build_image.sh, clean_image.sh, build_volumes.sh, clean_volumes.sh, start_containers.sh, and stop_containers.sh).
 |
