This is the first article of Getting started with Docker series. Here I would like to explain what is Docker and how I use it in my day by day job. To make this series more practical, I will show you how to write your first “Hello World!” containerized application. In the next articles, I will show you how to create a PostgreSQL cluster.
Why Docker?
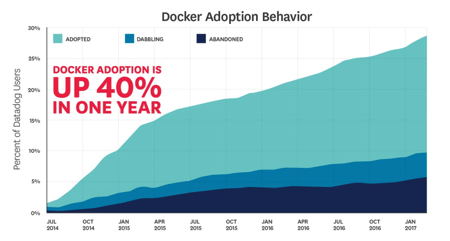
Docker is a hot technology adopted by the most important companies in the world. The following picture shows the adoption growth in recent years.
This other picture shows some numbers relative to Docker. It’s clear that in recent five years the technology acquired a good momentum and its adoption has grown very fast.
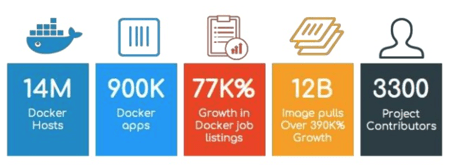
Photo from www.slideshare.net
However, containerization is not a new concept and as you can see in the following figure it goes back to 2004. The question now is why the containerization has become so important only in recent years?

Photo from www.slideshare.net
Why Docker is so important?
To understand why Docker has this huge momentum you have to consider the problems that it solves from the perspective of the three main actors of the technology landscape: developers, operators, and companies.
Developers
The company behind Docker has always described the program as fixing the “it works on my machine” problem. This is a very old problem that always tormented developers. Usually, a developer creates an application that works fine on his machine but it doesn’t in a test or production environment.
The problem happens because the development environment configuration could not perfectly match with the one in test or production environments. Docker solves this issue because the container encapsulates the application with all its dependencies so that it is the same in development, test, and production.
Operators
The operators besides being victims of the “it works on my machine” problem, sometimes they must deploy applications according to requirements that don’t fit with the original design or they should fight with applications that are too sensitive to the environment configuration.
For example, imagine an operator need to deploy application A on a server S. Then to save cost he needs to deploy another application B on the same server that for some reason cannot coexist with A. Docker solve this problem because a container encapsulates each application with its own dependencies. Moreover, Docker allows them to easily manage the application lifecycle (deploy, upgrade, start, stop, removal) in a very easy and scalable way.
Companies
Companies suffer from the same problems above with a higher order of magnitude because they have a lot of employees that are developers and/or operators. However, the great benefit that Docker provides to them must be identified in the way in which they design modern applications.
Twenty years ago applications were a unique monolithic piece of code. Usually, these applications were managed by large teams and contained thousands of lines of code. Maintenance of these applications was hard because any change in the code required its complete build and deploy to test it.
In recent years, application designers started to consider convenient divide the applications in microservices each one implementing specific application requirements. Small agile teams manage the lifecycle (development, test, and deploy) of these microservices. Maintain a small piece of code is easier than a big application and the release of new functionalities becomes faster.
Today hundreds of microservices compose applications like Netflix and manage their deployment lifecycle (install, configure, and upgrade) and dependencies is not an easy task. Here where Docker comes into play.
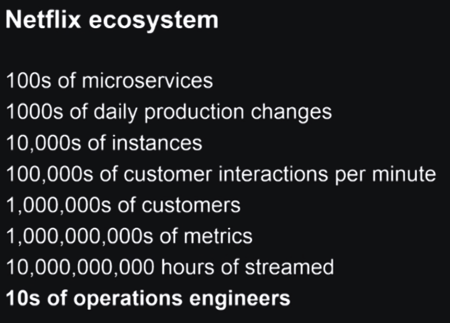
Photo from medium.com
Microservices can be deployed in a container with all the dependencies. Deploy a microservice means deploy its container that usually occurs in few seconds without pains. Upgrade of the microservices is simply the removal of the old container and the add of the new one.
Microservices data usually are separated from the code so that the microservices are stateless and then more easy to update.
What is Docker?
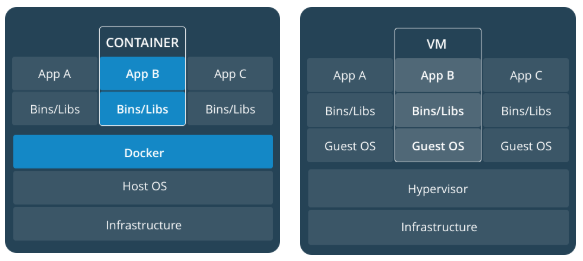
When I started working with Docker, the first thing I needed to learn was what Docker really was and its main differences with a virtual machine. Here how Docker is defined on its official website:
Docker is an open platform for developing, shipping, and running applications. Docker enables you to separate your applications from your infrastructure so you can deliver software quickly. With Docker, you can manage your infrastructure in the same ways you manage your applications. By taking advantage of Docker’s methodologies for shipping, testing, and deploying code quickly, you can significantly reduce the delay between writing code and running it in production.
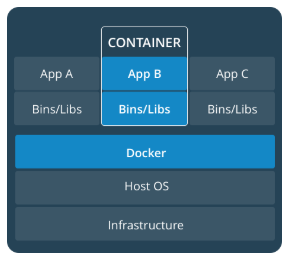
From this definition, it’s clear that Docker is an isolated environment on your target system where your application runs with its own dependencies that are completely unrelated to the other software deployed on the system. This isolated environment is called Container.
More details about the differences between Containers and Virtual Machines will be discussed here.
The next thing I had to learn was the Container concept in detail. Docker is based mainly on this concept and in order to understand it, I needed to understand first the Docker image concept.
What is a Docker Image?
A Docker image is a read-only template with instructions for creating a Docker container. For example, you may build an image that is based on the Ubuntu operating system and installs the Apache web server and your application, as well as the configuration details needed to make it run. Often, an image is based on another image, with some additional customizations.
You might create your own images or you might only use those created by others and published in the official Docker HUB. To build your own image, you create a Dockerfile with a simple syntax for defining the steps needed to create and run it. Each instruction in a Dockerfile creates a layer in the image. When you change it and rebuild the image, only those layers which have changed are rebuilt. This is part of what makes images so lightweight, small, and fast when compared to other virtualization technologies.
What is a Container?
According to the official website, a Container is:
a runnable instance of a docker image. You can create, start, stop, move, or delete a container using the Docker API or CLI. You can connect a container to one or more networks, attach storage to it, or even create a new image based on its current state. By default, a container is relatively well isolated from other containers and its host machine.
A container is the runnable instance of a docker image. You can have multiple containers running on a target system and the user that access to them has the feeling to be on an isolated system with its own filesystem, networking, volumes, IPC and so on. The main difference between containers and virtual machines is that these containers share the same kernel and use their isolation mechanisms (i.e. namespaces) to create the illusion of virtualization.
A container, however, is more efficient than a virtual machine because it does not add any layer between kernel and application but it only uses its isolation mechanism that does not degrade performance. This is the reason why modern architectures deploy a containerized version of applications in order to avoid classical dependencies problems of a normal on-premise application.
How to install Docker
Docker official documentation contains detailed steps to install it, I suggest following the instructions reported there to install the product on your machine. I suggest also to read the Getting Started guide to get familiar with the Docker CLI commands.
Docker cheat sheet
Start learning Docker from the official documentation is a MUST for whoever wants to be serious about it. However, to start playing with Docker it is sufficient to know very few commands and practice with them.
For this reason, I created this cheat sheet with the most important commands that I use every day. You can start with them to get familiar with the platform. Once you learn them, read the official documentation will be easier.
To list all the available images you can use the following command:
docker image ls
At the very beginning, the list is empty. Now suppose you want to download an Ubuntu 16.04 (Xenial) image and store it on your system. On the Docker HUB, you’ll find a lot of images you can start to play with. The command to run is the following:
docker pull ubuntu:16.04
Now if you run the “docker image ls” command the following will appear:
ubuntu 16.04 a35e70164dfb 1 minute ago 222MB
You have installed the image on your system. Start an instance of this image (the container) using the following command:
docker run -it ubuntu /bin/bash
You created a container called “ubuntu” with a bash shell you can use to run whatever Ubuntu command. In another host shell you can run the command to list all docker containers running on your system:
docker container ls
Whenever you close a container you lost all the changes you applied to it. In order to avoid this, you can create a snapshot of the current container state so you can recover it whenever you need it. The command to do that is:
docker commit CONTAINER_ID TAG
It creates a new image TAG with the status the container had when you committed it. The CONTAINER_ID is the number that identifies the container and that you can retrieve it with the “docker container ls” command.
The strategy to commit containers to avoid to lose the work you have done on a Docker image is a good strategy but sometimes you need to create a custom image starting from a basic one downloaded from a docker registry and share it with your team or customers or simply using it as a starting point for your activities. In this case, could be useful to create it using a Dockerfile and the Docker build capabilities.
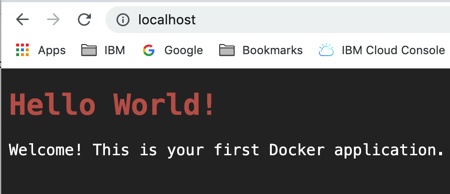
How to create a “Hello World!” Docker application
The first program you write when you learn a new programming language or technology is the classic “Hello World!”, an application that simply prints the “Hello World!” message.
To make things more interesting let’s create a Docker container with a web server (Nginx) listening on port 80 that accepts connection from a web browser and print the “Hello World!” message.
Here the Dockerfile code to build the Docker image from which we will create our container.
FROM ubuntu:16.04
RUN apt-get update; apt-get install -y nginx
COPY nginx.conf /etc/nginx/nginx.conf
COPY ./www-data /home/www/www-data
EXPOSE 80
CMD ["nginx"]
FROM is the keyword used by Docker to specify the docker image to use as a starting point. In our example, we start with Ubuntu 16.04. In order to download software packages, you need to run the Ubuntu apt-get update command. RUN is the keyword used by Docker to run a command on the target image. We will use it to install the Nginx package.
Then we use the COPY command to copy the nginx.conf file and the www-data folder on the image. the nginx.conf file simply tells Nginx to listen on port 80 and retrieve files from folder /home/www/www-data. This folder will contain the index.html file that prints the “Hello World!” message in the browser. Docker provides the ADD command that is similar to COPY, the only difference is that all the compressed files are uncompressed when copied on the container image.
The command EXPOSE tells Docker to map the port 80 on which the web server listens. In this way, when we start the container we can map this port with a port on the host system.
Finally, the CMD command tells Docker which command to start when the container is started. In our case, the Nginx web server is started.
Run the “Hello World!” application
To build this image you can run the following shell command:
docker build -t TAG .
Docker will build the Dockerfile in the current folder. If you issue the “docker image ls” command, you’ll notice the new image TAG appeared on the list. To run the docker image just created give the following command:
docker run -d -p 80:80 TAG
The -d option will start the container in detach mode so that the shell doesn’t hang.
Open your browser and type localhost in the address bar. You’ll see the “Hello World!” message appear.
If you want, you can access the container using the command:
docker exec -it CONTAINER_ID /bin/bash
where you can retrieve the CONTAINER_ID with the “docker container ls” command.
What’s Next?
In this article, you learned the basics of Docker and you wrote your first Docker application. You can download the source code from here in the hello-world folder. In the source code, you’ll find some helpers scripts (i.e. build_image.sh, clean_image.sh, start_containers.sh, and stop_containers.sh) to build and cleanup the image and the container. In the next article, we will focus on the main differences between Containers and Virtuals Machines.
 |
